Friday, March 8, 2013

Realistic Watercolor Effect in Photoshop

Creating a watercolor effect of a photo isn't that hard as you think. With Photoshop, you can easily make one in just a few steps (about 2 to 5 minutes) with convincing results. What we are about to do here looks more like a watercolor photo painting where we use a few of the filters and blending modes. Colorful images with good contrast works perfectly with this tutorial.

PREVIEW

Here is our before and after image which we will show how to achieve in this tutorial.

Bring in your photo, duplicate it three times (3x). The duplicate layers, namely: Layer 1, Layer 1 copy, and Layer 1 copy 2 would then be created and visible in your layers palette.

* Don't be bothered with the Hue/Saturation layer above the background layer. I've just inserted it ahead with the next step where it should appear. It's your preference if you want to follow like this or create it later in the next step. There's no problem here.

The above photo can be downloaded here.
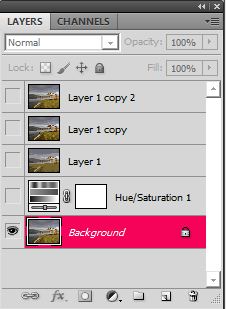
Before we go on with the editing process for the created layers, let's make a bit of adjustment to our background image. To do so, select Hue/Saturation and set the following values below. This will add more colour and warmth to the image.

Now, let's get started with the editing work... Turn off the two (2) top layers, then activate Layer 1. Apply Cutout filter (Filter>Artistic>Cutout...) with the following settings:

Set Blend Mode to Luminosity.

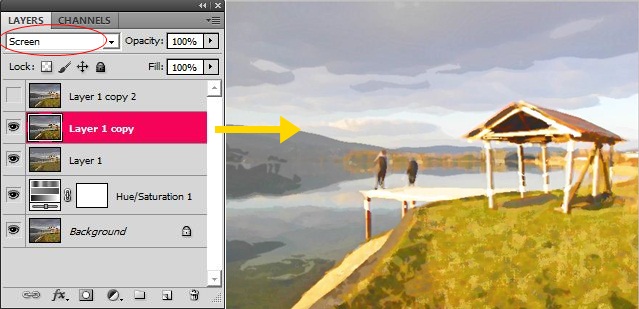
Turn on and activate Layer 1 copy. Apply Drybrush filter (Filter>Artistic>Drybrush...) with the following settings below. Set Blend Mode to Screen, afterwards.

Activate the topmost layer now and, this time, apply Median filter (Filter>Noise>Median...) and apply the following settings:

Set Blend Mode to Soft Light.

Once more, let's take a look at our final image...

Done!

Friday, March 1, 2013

Pop Art Effect in Photoshop

Pop art is an art movement that emerged in the mid-1950s in Britain and in the late 1950s in the United States.Pop art presented a challenge to traditions of fine art by including imagery from popular culture such as advertising, news, etc. In Pop art, material is sometimes visually removed from its known context, isolated, and/or combined with unrelated material. The concept of pop art refers not as much to the art itself as to the attitudes that led to it. Some of the most notable pop artists are Andy Warhol, Roy Lichtenstein, and Jasper Johns.

(You can read more of pop art history here.)

  1. Color Separation
    • First off, we will remove all visible shades from the image to convert it into some kind of solid color shapes. Following are the steps how to do it:

    • Open a photo you would like to edit. Resize it to your preferred size. Medium size would be okay.
    • Duplicate it, then set the blend mode of the duplicate layer to Luminosity.
    • Invert it (Image>Adjustments>Invert...), then set the Opacity to 50%.
    • Ctrl+Shift+Alt+E to create a new layer (Layer 2). Delete Layer 1, we don't need it anymore.
  2. Image Posterization
  3. After we've eliminated the shades of the image above, this time, we will increase the saturation to achieve a posterize image of solid color effect.

    • Activate the Background layer and duplicate it. Move this new layer to the top.
    • Set the blend mode to Multiply.
    • Select the top layer, then apply Threshold (Image>Adjustments>Threshold...). Just click Ok for the default value settings.
  4. Increasing the Saturation
    • Select the middle layer, then go to Hue/Saturation (Image>Adjustments>Hue/Saturation...). Set Saturation to optimum to the right or, if you prefer to, check the box in Colorize.

Final Result

  • If you prefer your image colorized with different color, just adjust the Hue slider to the left or right. You can also adjust the Saturation if you want to while adjusting the Hue. It's a matter of preference really.

Monday, January 28, 2013

Create a Colorful and Grunge Background Effect

In this tutorial, you will learn how to create colorful curves and grunge background for your favorite model or probably your own photo yourself. I really intended the easier route in creating those arch shapes instead of the more tedious pen tool way of doing it. This is not, however, a substitute for the pen tool because this has its own advantages especially so when you're already familiar and master of it. It's your own preference really what tool and method to use relative to this tutorial. But then, this tutorial is good too in its own right. So, let's get started and find out what we have here!

Preview
What you need
  • model's photo
  • grunge paper texture
  • floral vector or image
Step 1 : Preparing the Background
  1. Create a new document, at least equal to or larger than your model's photo size. Duplicate it, then fill this with black.
  2. Open your grunge paper texture. Make a mask out of it by clicking the mask icon below the layers palette, then by using a big soft brush, paint the edges of the paper texture to make a vignette. In so doing, we're making sure that the model we'll paste into later will be highlighted.
  3. Make a new layer. Again, with a big soft brush, paint randomly the edges with different colors. About 4-6 of these will do. Set mode to Lighten.
Step 2 : Bring in the Photo
  1. With the photo now on the canvas, make a selection of the model using any of your favorite selection tool, then paste it onto your newly-created texture.
  2. Click the "Add a layer style" icon (fx) below your layers palette, then choose Outer Glow with the following settings:
  3. You'll notice that our background is too bright, so we'll have to darken it a bit to have a balance contrast with our model. Switch back to Layer 3, then click the "Add a new fill or adjustment layer" icon and select Brightness/Contrast. Bring in the slider to the left until it matches the outcome below:
Step 3 : Put the Floral Vector in Place

Open the floral vector and put it behind the model, on the upper part, because we'll be making the colored moons or arcs below it. Set the blend mode to Color Burn to remove the white background. So no need in selecting it to remove from the background.

Step 4 : Creating the Colored Moons
  1. Create a new layer group to make the colored moons (arcs, or whatever you may call it). This will make our work organized and put all these moons into one folder or group for easier editing if needed.
  2. Now, create the moons one-at-a-time, a new layer each of them. To do it, make a circle using the Elliptical Marquee Tool, then apply a gradient of your choice ("Create a new fill or adjustment layer" icon>Gradient fill...). To erase and make it like a comb moon, create a new circle then use the Eraser Tool to easily wipe the selection. Make this method for the rest of the moons. Put these all behind the model's layer except for the last which I place it on top.
  3. Note : You can use the Free Transform Tool to resize and reposition the created circles, or, use the arrows alternately. You can also use the Warp Tool under Transform to alter the shape you've created if you happen to prefer it that way.
Step 5 : Finishing Touches

Finally, apply Curves to enhance the contrast of our final image by dragging and making the line into an "s-hape". Experiment which values create the best output here.

Conclusion
You can definitely add more effects in the background, like putting splatters and others that you can imagine that adds up more colour and depth maybe. But then this tutorial limits only to the basics that will however hopes to open up more and better ideas to the reader and/or artist in you.

Friday, January 11, 2013

Switch Faces in Photoshop

Replacing or switching faces is one of the funniest a beginner in Photoshop can easily do. In just 5 to 10 minutes (or even lesser), you'll be able to see your finished product with amazement and wide grin, or, you may burst with laughter of what you've done! And then you can even brag to your friends what you've created! Let's get started...

Preview

All you need is a photo of 2 person or more that you will work with. Similar face position is easier to deal with, so choose your photo well. It doesn't matter what facial expression it has.

Step 1

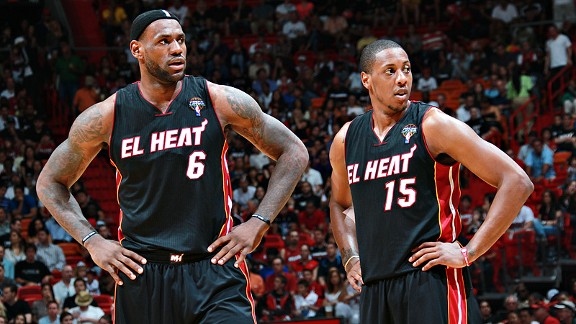
Open the photo to be used. Below is a photo of James and Chalmers of Miami Heat which we will use in this tutorial.

Step 2

Duplicate the Background layer, then select the face of Chalmers or James (whichever) first via the Lasso Tool (or any of the selection tools). Copy and paste when done. Do the same thing for the second. After hitting "Paste" (Edit>Paste...) the first time, a new layer named Layer 1 is created in you layers panel. Rename this to "Chalmers" so you can remember which face was copied. As for James, Layer 2 is created, so rename this to "James".
To paste the selected face, just grab the Move Tool and drag which face will be pasted first. Do the swapping. Fix the positioning and resizing by using the Free Transform Tool (and Perspective, if needed).

Step 3

Apply Layer Mask to both "James" and "Chalmers" layers and, using a small, soft brush, 50% Opacity, brush around the selected faces to remove rough edges or unnecessary parts on the image.

Step 4

After fixing the rough edges, you may apply some adjustments to the color and contrast to the skin to look realistic. At some instances, depending on the photo used, you may also need the Dodge, Burn, and Clone Tools. Like the final image below, I applied the Curves adjustments to make the contrast better.
Done!

Friday, January 4, 2013

Create An Abstract Shape Effect Into An Image

Creating a unique and nice effect to your valuable photos is something you can keep and be proud of, if done properly which, I bet, you can do it easily. In this tutorial, you can easily follow the instructions step-by-step, and you'll be amazed of what you've created. This is a variation with a different approach and much better compared to the more familiar collage or jigsaw puzzle effect.

Preview

Step 1: Preparing the Photo

Open your photo to be used, double-click the layer created in the layers palette to unlock it which becomes "Layer 0" as a result. The image I used can be downloaded here if you prefer to use this to get along.

Step 2 : Creating the Rectangles

Create a new layer above the existing layer. Grab the Rectangular Marquee Tool then make rectangles with different sizes randomly onto the image. Don't fill the whole photo yet with rectangles as we will be creating 2 layers more of this.
Note: After the first rectangle had been made, press Shift while making the other rectangles to work. This is so, because the rectangles would just be repeatedly deselected otherwise. When done with the rectangles, click on the color palette and choose the gray color (or any color of your choice), then use the Bucket Tool and fill one of the rectangles. That would automatically fill in all the others. Set the blending mode to Overlay, Opacity to 100, and Distance to 7 (or just leave the default values). Click Ok. Here's the result:

Step 3 : Creating the Second Set of Rectangles

Create another layer and do the same process as Step 1 except for the color which should be light gray. When finished, click Layer 1, right-click it and select "Copy Layer Style". Switch back to Layer 2, right-click it and select "Paste Layer Style".

Step 4 : Finishing the Last Set of Rectangles

Create rectangles again, but this time use white color to fill them. Afterwards, activate Layer 3, right-click it, then select "Paste Layer Style". So, finally, we're done with the rectangles and here's what we got:
You can already stop here actually, if you like to. Lookin' good eh! If you prefer to proceed, then we'll continue...

Step 5 : Choosing the Background

You can put any background you want. Here, I preferred to have a simple yet effective solid color. So, to do it, Ctrl-click first Layers 3, 2, 1 icons to select the contents, then activate Layer 0 (our original layer), hit Ctrl-J to create a new layer (e.g. Layer 4, as a result). Select Layer 0 again, then after selecting the orange color, go to Edit>Fill..., then select the foreground color. Here's our layers palette look like :
Here's the final result :