Sunday, February 16, 2014

Smooth Skin Enhancement in Photoshop

We all get older. Without notice, wrinkles, blemishes, and signs of aging are now apparently emerging on our face. And before you knew it, your looks seems so embarassing that you are having second thoughts of posting and sharing your photos to your friends. Is there a way to fix it? Yes, of course, there's a solution to that! With a little bit of knowledge of Photoshop, you can fix your photos without sweat. Following guides you through a 3-step instruction in achieving the expected outcome. Preview
Step 1 Open your photo and make a duplicate out of it. To do this you can either right click the background layer (your photo thumbnail) and select 'Duplicate layer', or, drag and drop to the 'Create a new layer' icon located below the layers palette.
Step 2 With the duplicate layer active, go to Filter>Blur>Gaussian Blur... Set the blur to about 2-3 pixels depending on the image size you're working with. Drag the slider to the right until you get the appropriate blur close to the one below.
Step 3 Now that we're done blurring the duplicate copy of our image, we are now with the interesting step in effecting a smooth and clear skin. To do this, first, Alt-click the layer mask icon located below your layers palette then, second, switch your FG/BG color to white. Ok, now, pick a soft brush with low opacity (about 10-20%) and carefully brush the face except the eyes, lips, nose outlines, and the jaws. With a low opacity brush in place, you can get rid of unwanted over-brushed portions and added editing to do. Details is important here as we are dealing with our subject in itself (i.e., skin softening). Here's how it looks:
Final Image As we have expected, here is the outcome:
As you can see, the wrinkles are still there but the smooth skin give the big difference. We can extend the smoothening process and removing the wrinkles totally, but that would defeat our purpose of enhancing the photo. Sure, we can make your photo 10 years younger but then that would certainly look horribly unnatural.

Sunday, June 30, 2013

Turn Photo Into A Pencil Sketch

Through the years, pencil drawing remains one of the best (if not the best, actually) medium and the litmus of any artist's ability when it comes to drawing or sketching. I've been drawing myself, since I took Architecture course in college then and, i must say, pencil drawing is the single most subject that interests me much and loved doing it up to this day. No other medium can replace it really.

In browsing the internet, I rarely find any tutorial that really satisfies me in creating a pencil sketch from a photo, except for this tutorial that I about to show. There is one more actually which is equally good but not a pencil sketch, but rather a line drawing that requires a lot of tracing and brush setting adjustments. I'll post this one too later.

The intent of this tutorial is to show how one can do a "pencil sketch effect" with some actual sketching stuff, close enough to a sketch drawing. The technique applied here, entirely dissimilar to other techniques using the "sketch filters" in Photoshop. This tutorial is credited to Tim Shelbourne which this material is based.

Open your selected image in Photoshop. Go to Layer > New Fill Layer > Solid Color, call it "Gray Fill," and click OK. Select a light gray from the Color Picker in the dialog box that appears.

The model I used here (see below) is a photo from NerySoul. Many thanks to her.
Click the "Create new fill or adjustment layer" icon at the base of the Layers palette and choose Pattern from the list. Click in the Pattern Swatch in the dialog box, hit the right-pointing arrow, and select Grayscale Paper or any light grayish pattern available in your gallery. Choose Dark Grey Flecks from the swatch. Increase the Pattern Scale to 100% and click OK. Set this layer to Soft Light, and 30% opacity.
Right-click/Ctrl-click the background layer and choose Duplicate Layer, calling the layer "Glowing Edges." Drag this new layer to the top of the stack and go to Filter > Stylize > Glowing Edges. Use the following values: Edge Width 3, Edge Brightness 11, Smoothness 10.
Invert the Glowing Edges layer using Image> Adjustments>Invert (Ctrl/Cmd+I). This layer only needs to be black and white, so go to Image> Adjustments> Desaturate (Ctrl/Cmd+Shift+U). Set the layer's blending mode to Multiply with an opacity of 20%.
Duplicate the background layer again, calling it "Sketch Layer," and drag this duplicate to the top of the stack. Desaturate this layer using Image > Adjustments > Desaturate (Ctrl/ Cmd+Shift+U). To use the layer as a base for the drawing, increase the contrast a little, by going to Image>Adjustments> Brightness and Contrast. Drag the Contrast slider to the right to a value of 25. Now set the layer blending mode to Darken and leave the opacity set to 100%.
We need to add some Noise to this layer to break the image up a little, so go to Filter >Noise> Add Noise. Use an Amount of 10%, choose Gaussian for Distribution, and check Monochromatic. Using the black and white photo above, you can now start scribbling to make the drawing with some special brushes…
Select the Brush tool and click in the Brush Picker. Click the right-pointing arrow in the Picker and choose Dry Media Brushes. Scroll down the thumbnails and double-click Pastel on Charcoal Paper.
Hit F5 on the keyboard to display the Brush Options. Click the Other Dynamics panel and set the Opacity Jitter Control box to Pen Pressure. Click Shape Dynamics and set the Size Jitter to Pen Pressure. Set Minimum Diameter to 70%.
Now you can begin sketching... Be sure that the foreground color swatch is white. In the Options bar, increase the size of the brush to between 20 and 25 pixels. Now begin to scribble onto the Sketch Layer's layer mask. At first, just concentrate on the main facial features within the image. Use just a little pressure on the stylus, or a very low opacity for the brush. Scribble loosely over all of the required parts of the image, changing direction often to create a hand-shaded look.

Use plenty of cross-hatch scribble where the strokes overlap in opposite directions. Remember, there is no actual drawing ability whatsoever required here, we are simply scribbling to reveal the pencil sketch effect of the image. Adjust brush sizes when needed especially to areas where tones varies in shading and intensity. Just let go of your brush strokes loose and free, until you come up with something realistic result that can be called your own (even if it’s not 100%)… your own version, at least! Here’s mine: (before and after)
Submit ExpressSearch Engine Placement

Friday, March 8, 2013

Realistic Watercolor Effect in Photoshop

Creating a watercolor effect of a photo isn't that hard as you think. With Photoshop, you can easily make one in just a few steps (about 2 to 5 minutes) with convincing results. What we are about to do here looks more like a watercolor photo painting where we use a few of the filters and blending modes. Colorful images with good contrast works perfectly with this tutorial.

PREVIEW

Here is our before and after image which we will show how to achieve in this tutorial.

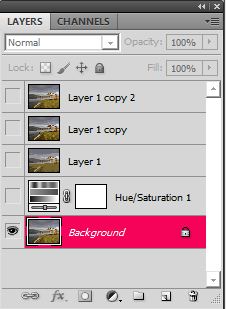
Bring in your photo, duplicate it three times (3x). The duplicate layers, namely: Layer 1, Layer 1 copy, and Layer 1 copy 2 would then be created and visible in your layers palette.

* Don't be bothered with the Hue/Saturation layer above the background layer. I've just inserted it ahead with the next step where it should appear. It's your preference if you want to follow like this or create it later in the next step. There's no problem here.

The above photo can be downloaded here.

Before we go on with the editing process for the created layers, let's make a bit of adjustment to our background image. To do so, select Hue/Saturation and set the following values below. This will add more colour and warmth to the image.

Now, let's get started with the editing work... Turn off the two (2) top layers, then activate Layer 1. Apply Cutout filter (Filter>Artistic>Cutout...) with the following settings:

Set Blend Mode to Luminosity.

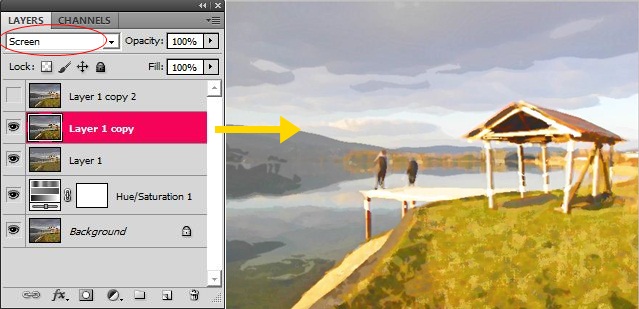
Turn on and activate Layer 1 copy. Apply Drybrush filter (Filter>Artistic>Drybrush...) with the following settings below. Set Blend Mode to Screen, afterwards.

Activate the topmost layer now and, this time, apply Median filter (Filter>Noise>Median...) and apply the following settings:

Set Blend Mode to Soft Light.

Once more, let's take a look at our final image...

Done!

Friday, March 1, 2013

Pop Art Effect in Photoshop

Pop art is an art movement that emerged in the mid-1950s in Britain and in the late 1950s in the United States.Pop art presented a challenge to traditions of fine art by including imagery from popular culture such as advertising, news, etc. In Pop art, material is sometimes visually removed from its known context, isolated, and/or combined with unrelated material. The concept of pop art refers not as much to the art itself as to the attitudes that led to it. Some of the most notable pop artists are Andy Warhol, Roy Lichtenstein, and Jasper Johns.

(You can read more of pop art history here.)

  1. Color Separation
    • First off, we will remove all visible shades from the image to convert it into some kind of solid color shapes. Following are the steps how to do it:

    • Open a photo you would like to edit. Resize it to your preferred size. Medium size would be okay.
    • Duplicate it, then set the blend mode of the duplicate layer to Luminosity.
    • Invert it (Image>Adjustments>Invert...), then set the Opacity to 50%.
    • Ctrl+Shift+Alt+E to create a new layer (Layer 2). Delete Layer 1, we don't need it anymore.
  2. Image Posterization
  3. After we've eliminated the shades of the image above, this time, we will increase the saturation to achieve a posterize image of solid color effect.

    • Activate the Background layer and duplicate it. Move this new layer to the top.
    • Set the blend mode to Multiply.
    • Select the top layer, then apply Threshold (Image>Adjustments>Threshold...). Just click Ok for the default value settings.
  4. Increasing the Saturation
    • Select the middle layer, then go to Hue/Saturation (Image>Adjustments>Hue/Saturation...). Set Saturation to optimum to the right or, if you prefer to, check the box in Colorize.

Final Result

  • If you prefer your image colorized with different color, just adjust the Hue slider to the left or right. You can also adjust the Saturation if you want to while adjusting the Hue. It's a matter of preference really.