Creating a watercolor effect of a photo isn't that hard as you think. With Photoshop, you can easily make one in just a few steps (about 2 to 5 minutes) with convincing results. What we are about to do here looks more like a watercolor photo painting where we use a few of the filters and blending modes. Colorful images with good contrast works perfectly with this tutorial.
PREVIEW
Here is our before and after image which we will show how to achieve in this tutorial.

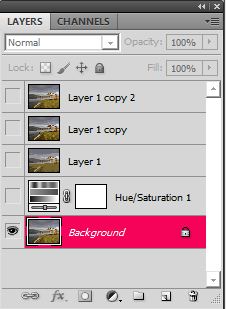
 Bring in your photo, duplicate it three times (3x). The duplicate layers, namely: Layer 1, Layer 1 copy, and Layer 1 copy 2 would then be created and visible in your layers palette.
* Don't be bothered with the Hue/Saturation layer above the background layer. I've just inserted it ahead with the next step where it should appear. It's your preference if you want to follow like this or create it later in the next step. There's no problem here.

The above photo can be downloaded here.
 Before we go on with the editing process for the created layers, let's make a bit of adjustment to our background image. To do so, select Hue/Saturation and set the following values below. This will add more colour and warmth to the image.


 Now, let's get started with the editing work... Turn off the two (2) top layers, then activate Layer 1. Apply Cutout filter (Filter>Artistic>Cutout...) with the following settings:

Set Blend Mode to Luminosity.

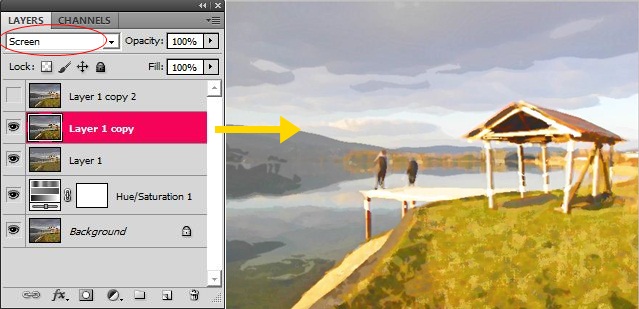
 Turn on and activate Layer 1 copy. Apply Drybrush filter (Filter>Artistic>Drybrush...) with the following settings below. Set Blend Mode to Screen, afterwards.

 Activate the topmost layer now and, this time, apply Median filter (Filter>Noise>Median...) and apply the following settings:

Set Blend Mode to Soft Light.

 Once more, let's take a look at our final image...

Done!


