In this tutorial, you will learn how to create colorful curves and grunge background for your favorite model or probably your own photo yourself. I really intended the easier route in creating those arch shapes instead of the more tedious pen tool way of doing it. This is not, however, a substitute for the pen tool because this has its own advantages especially so when you're already familiar and master of it. It's your own preference really what tool and method to use relative to this tutorial. But then, this tutorial is good too in its own right. So, let's get started and find out what we have here!
Preview
What you need
- model's photo
- grunge paper texture
- floral vector or image
Step 1 : Preparing the Background
- Create a new document, at least equal to or larger than your model's photo size. Duplicate it, then fill this with black.
- Open your grunge paper texture. Make a mask out of it by clicking the mask icon below the layers palette, then by using a big soft brush, paint the edges of the paper texture to make a vignette. In so doing, we're making sure that the model we'll paste into later will be highlighted.
- Make a new layer. Again, with a big soft brush, paint randomly the edges with different colors. About 4-6 of these will do. Set mode to Lighten.
Step 2 : Bring in the Photo
- With the photo now on the canvas, make a selection of the model using any of your favorite selection tool, then paste it onto your newly-created texture.
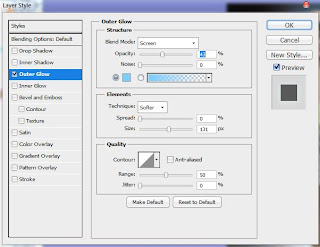
- Click the "Add a layer style" icon (fx) below your layers palette, then choose Outer Glow with the following settings:
- You'll notice that our background is too bright, so we'll have to darken it a bit to have a balance contrast with our model. Switch back to Layer 3, then click the "Add a new fill or adjustment layer" icon and select Brightness/Contrast. Bring in the slider to the left until it matches the outcome below:
Step 3 : Put the Floral Vector in Place
Open the floral vector and put it behind the model, on the upper part, because we'll be making the colored moons or arcs below it. Set the blend mode to Color Burn to remove the white background. So no need in selecting it to remove from the background.
Step 4 : Creating the Colored Moons
- Create a new layer group to make the colored moons (arcs, or whatever you may call it). This will make our work organized and put all these moons into one folder or group for easier editing if needed.
- Now, create the moons one-at-a-time, a new layer each of them. To do it, make a circle using the Elliptical Marquee Tool, then apply a gradient of your choice ("Create a new fill or adjustment layer" icon>Gradient fill...). To erase and make it like a comb moon, create a new circle then use the Eraser Tool to easily wipe the selection. Make this method for the rest of the moons. Put these all behind the model's layer except for the last which I place it on top.
- Note : You can use the Free Transform Tool to resize and reposition the created circles, or, use the arrows alternately. You can also use the Warp Tool under Transform to alter the shape you've created if you happen to prefer it that way.
Step 5 : Finishing Touches
Finally, apply Curves to enhance the contrast of our final image by dragging and making the line into an "s-hape". Experiment which values create the best output here.
Conclusion


No comments:
Post a Comment